Hey everyone, three parts to this, part one Talos, part two rhino, and part three weathering. Its a lot of thoughts in one article but I have been dragging my feet on a lot of things I've wanted to post about and just need to have a vomiting of information onto the blog moment.
Part One:
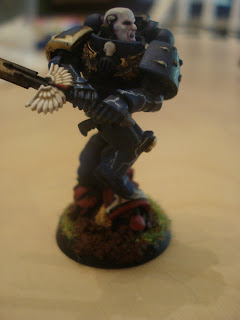
I got a lot of local feedback about Talos and they were all right; he wasn't done. I was just really excited and happy with how he turned out and wanted to show him off a bit. So here is the real finished Talos:
I'm glad I have painter friends who can call me out. Even if it's on accident like OST with his comment. He called me that day and said what he wrote about how it'll look good when its finished, but then after posting realized...I said it was finished. Truth is way better than a "yeah...that looks...uh...great dude..." Deathbringer sent me a text saying "I thought you were doing Night Lords." Then when Capt Ob said I didn't high light it, it was time to try again. So I highlighted it (I don't want him to be too bright, he is a Night Lord after all), and added the lightning and touched some other spots up a little. He's really finished as much as I want him too now and will be a great First Claw leader.
Part Two:
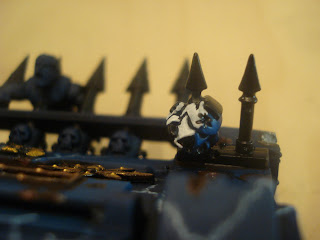
WIP of my Rhino. You guys saw this rhino before, here, and after it was posted I striped the model. It was never intended to go up like that as a WIP at all since I was just experimenting with the design. I hated it. Again, after a lot of local feed back I realized it was a bad fit for what I wanted.
I want a clean but worn look. I still have some weathering to add to it in the rust and some muding/dirt/soot to do, but for now, its on track and I wanted to put it up so I can talk about how I did the Lightning effect since everyone loves that look for at least their power weapons.
A little moment of clairity I had while do this was when I was thinking 'do I want this old battle damage and rusty or new fresh damage?' Then I was like 'wait...why not both?!' I never thought about it in the past but a tank, if it isn't able to maintained would have all different stages of damage/corrosion/wear and tear on it. Tanks totally rusted out must not have seen battle in years. That wasn't what I was looking for. I wanted a tank that was old and still in use. It had to have fresh and old damage.
Here is a door I made out of mostly plasitcard, some bits, and a little green stuff. I made a cast of it and this is actually one of the casts, not the original and I'll be using it for all my rhino rear hatches. Its a take from a chaos ad mech symbol I found on the interweb and really like the concept. It fit into the Night Lords being chaos but still honoring some of their loyalist roots.
Desecration of the Aquilla. Scavenged rhino, Night Lord-ified. In Soul Hunter (awesome book, buy it, read it) most of them still wear their heresy armor and have removed or desecrated any sign of the emperor or they have scavenged newer sets and destroyed the markings on those such as my Talos model and his desecrated chest piece. I'll be making this look more like tarnished gold since they wouldn't be polishing it up to be pretty.
In Blood Reaver they fight with The Marines Errant. Just a little fluffy touch. Also Soul Hunter is why there is so much Blood Angel hate. I don't do it because I hate them in real life, I think their codex is dumb.
Guardsmen who is having a bad day. I also have two Astartes bodies on hooks but I'm redoing the hooks to look better. They go on each side to the front of the first exhaust structure. I was go for terror with all the bodies every where. Next I'll be working on that crucified space marine.
Part Three:
The hobby stuff. Whenever you're going for any effect take a look at what it looks like in real life. The internet brings you everything good and evil right to your home so whether you need to know what sad eye kittens look like or what a cafe suicide bomb aftermath looks like the internet will without judgment deliver your viewing pleasure.
 First lightning. Notice how it doesn't really have any long straight lines. Its basically a jagged line. Whenever I see lightning on a model done with straight angled lines it makes me a little sad. To do decent looking lightning you really don't even need to be a surgeon with your brush. In fact, they shakier your hand, the better it'll look. When I painted the ones on the Rhino, I looked like I had Palsy.
 Mix 1:2 paint to glaze and start painting your lines. I stacked up a few coats, wider to thinner and all were still shaky so that I had an uneven edge of color which provides the nice fade in. Since my model was already a dark blue I skipped that and went straight to enchanted blue, then lightning blue and then white. Each color took 3 or 4 layers but they do go pretty quick so this doesn't take as much time and you would think. A down fall to the glaze is that its really glossy so you'll need to Dull Coat it afterwards, but once you do that it'll make the glaze seamless.
Now for the rust.
 Here are some real life references to rust. The thing that gets forgotten about rust is that it has multiple colors in it, not just brown. Rust is actually a pretty awesome coloring or browns, reds, oranges and yellows. Keep that in mind when doing your rust. Right now on the rhino, its only got the brown but I haven't gone back in to put the other colors there yet.
 Secondly, take a look at how the rain run off looks when doing your run off. Think about how water would actually flow on your model. If a trail hit a rivet, it wouldn't run off one side, the surface tension of the water would pull it to surround the rivet. Also, think about how the water would pool. when the trail hits a flat area it would set there and allow all the rusted metal particles to settle so you should get a really dark area of not rust but settled particles in those flat areas. Then think of how the water would run off of that once it was full. Living in Michigan I get to see a lot of rusted out cars so I have daily inspiration to how rust looks on vehicles. If you're on the west coast take some time to look at rusted cars on the internet to see how they look and what that run off looks like.
Well, there it is, the three part article of loosely connected ideas. Any questions feel free to post in the comments. Experiences with glazes, thoughts on lightning, or how you do your weathering, pleas share with the class!


Good stuff. Keep it up.
ReplyDeleteGreat stuff man I really like the rhino it looks sharp.
ReplyDeleteExcellent post!
ReplyDeleteThanks. My 40k life needs to be put in check (I've been doing 40k crap every day for at least 3 weeks) so I'll be slowing wwwaaaayyy down on this project. I've been so excited to see it get off the ground that I know its only a few days from the wife saying "Hey, Chris, you're getting a little obsessed, you're going to need to reel it in." I'm going back to what I wanted with this project; hobby. So that means whenever I'm bored or have absolutely nothing to do I'll put some paint on models, but not every night like I have been.
ReplyDeleteBut thanks for the comments, I appreciated them.
I think this Rhino is amazing! Love it.
ReplyDelete