

TJ back again to talk about turning a toy into a 40k model with my Todd McFarlane Spawn/ Soul Grinder mash-up! I'm going to pick right up from the last article where we finished by fixing the toy's pose with glue, so let's get right to it.

Step 5: Fill Gaps
Once you fix the pose on the model, you are going to be left with gaps where the toy was designed to move. You need to not only fill these gaps, but also match the texture of the surounding area. For this you will need a sculpting tool and some Green Stuff. For filling lines like the kind above, I make a thin string of green stuff and place it directly over the gap and use the tool below to make it match the model.

I don't know what this tool is called, but if I only had one sculpting tool, this is the one I would take. I use the round end to do all of my pulling, pushing and general sculpting, while I use the knife end for cutting, scraping, making straight lines, flat edges, ect.
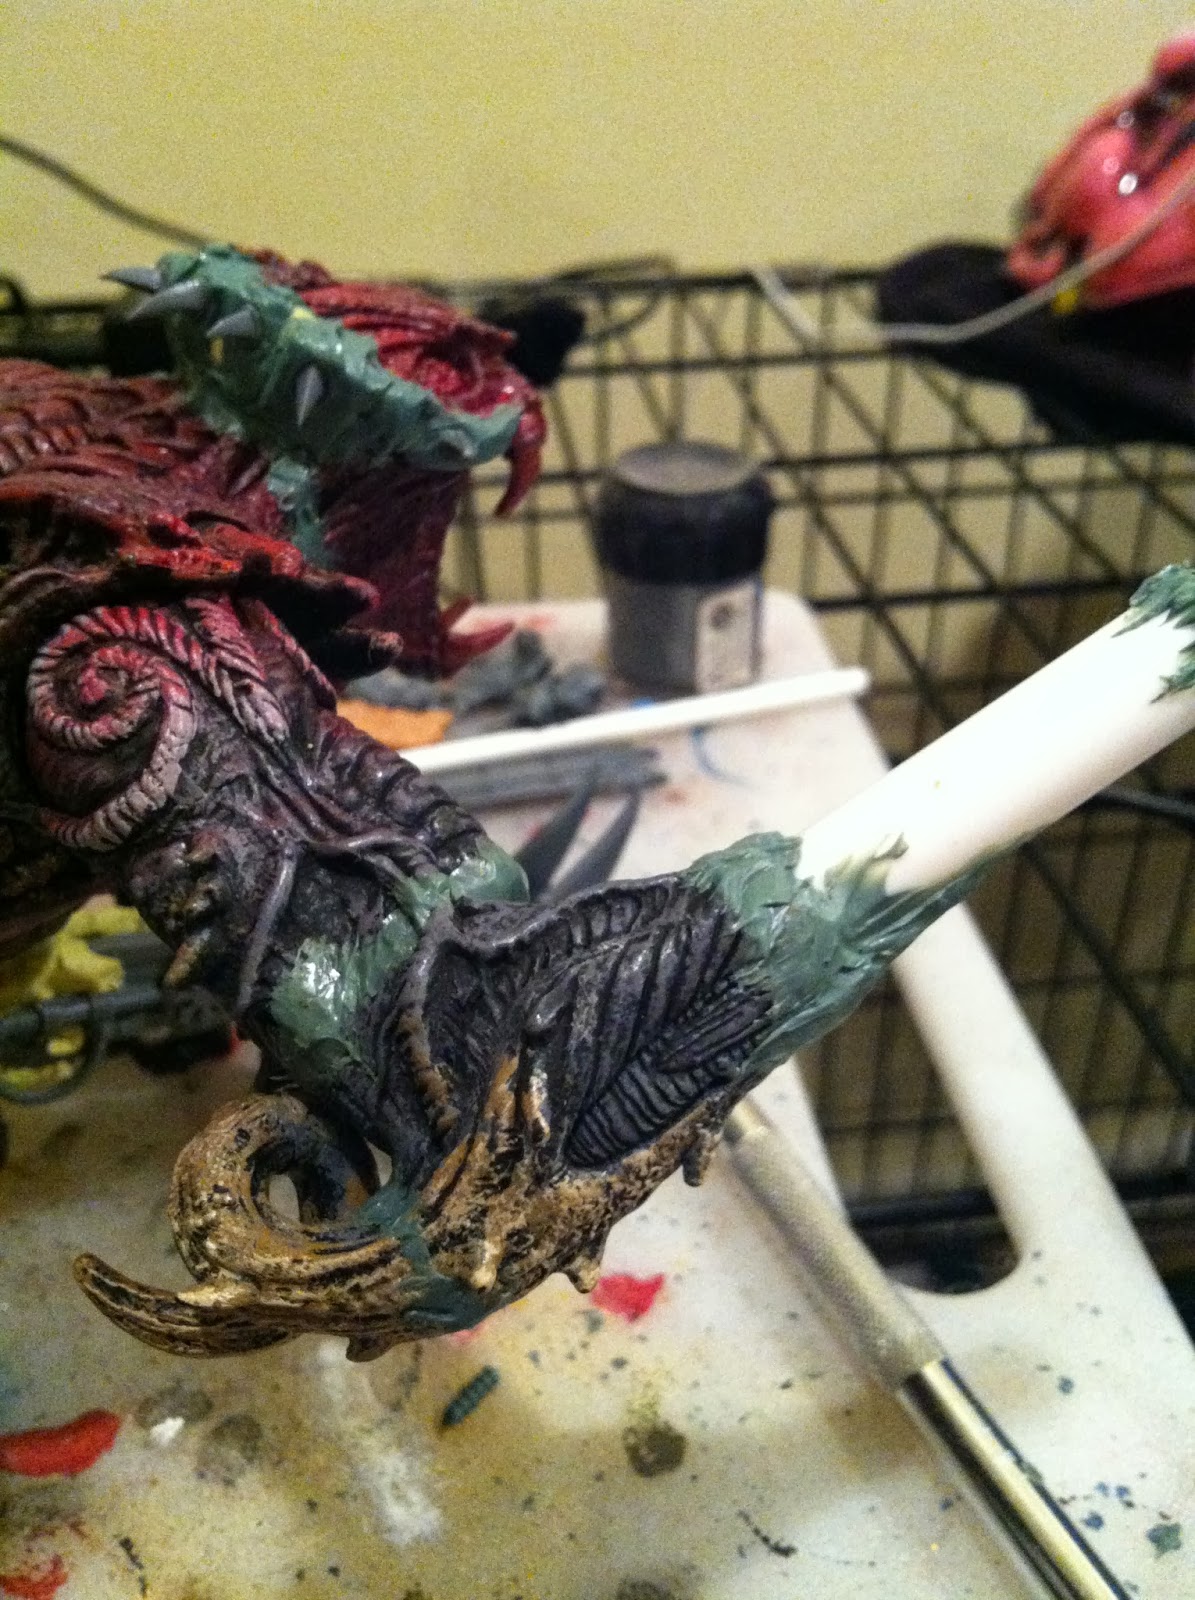
Step 6: Marry the parts
Once you fill all the gaps, you are going to start marrying parts. Much like the gap-filling, you will lay down green stuff in the area you need to marry up, like the gun and arm above. The first thing I do is flatten the green stuff down and make sure it matches up to the arm without making a weird ledge. After it has been matched, I then begin to pulls and sculpt to make the green stuff not only look like flesh that is melding into the weapon, but also to add some texture to the sculpt to match the texture of the arm.

You can see that I did something similar with the hull and the body as well.

You can really see how the steps have led us to a very believable looking model rather than some toy-imposter on our 40k table.

Step 7: Cosmetic Changes
Now it is time to go through the model and make some of those minor changes that will take the model (it's a model now and not a toy) to the next level. You want to make details pop! For instance, details like the claw above ...

... and this one that I made match the other with a little extra green stuff.

If you are feeling ambitious, you can make bigger changes. I want to cover up the cuts I made when I removed the model's crest and also make the head look cool, so I added some green stuff, quickly matching the basic shapes of the areas I intend to blend into my sculpt.

I then sculpted the green stuff to match the texture of the head.

I took a look at it from a distance and decided that it still didn't look done.

So I reached into the bitz box and added a few Tyranid bits for a nice touch.

Now the head looks complete and once paited will give the impression that this is the original shape and how it was supposed to look, which is what you want to get out of all your conversions.

Now that the hard part is over ...

go to the local gas station for a cheap drink! The hard part is over and you are on your way to painting your model!

Bonus tip on Milliput!
Ok, so you noticed all the "yellow stuff" on my model. This is Milliput. Many folks have still never heard of it, but it is really a great tool for those who do a lot of sculpting and can also save you money.

For some of these large areas that need blending and sculpting, you also need a lot of material just to fill the space. Green Stuff is expensive but there is a cheap, air drying, two part putty that can help you, called Milliput.

It is a little harder to sculpt, so when I use it, most of the time I intend to come back later and sculpt over it with a thin layer of green stuff.

All I do is add it to the space I need it in and then shape it to match what I roughly want it to look like in the end, so I end up with very little work to do with the green stuff later.

With all that said, I think that selecting a good toy and putting in the proper work can give you a great looking model at the end of the day, but it does take work. It often times is a little more difficult than a normal conversion.

That doesn't mean it's too hard though. The green stuff techniques and the steps I used to build this model are not very difficult and if you are interested in doing something similar, you should give it a try. You will surprise yourself!

I only have a little more work to do before I can paint this model. I hope you have enjoyed the tutorial and as always, I would love to hear your thoughts and feedback.
Looking good!
ReplyDeleteThanks, a Steel Reserve always looks good after a long night converting toys into models!
ReplyDeleteComing along nicely.
ReplyDeleteYou mentioned it in your first post, but even after taking the steps to remove the bendable parts that will cause lack of adhesion of paint, do you expect to have issues with that in the future?
How does their plastic hold up to GWs?
Fly, I likely have the same plastic on my Helbug (used to be an educational model/toy) and it seems to have held up fine these passed few months. I did mess up the surface a bit with some Methyl Ethel Keytone, which gave my paint something more to grab, I think. I'd be more worried about the sculpted bits staying attached, unless they are pinned. But, both GS and Millupt are pretty sticky so unless we each drop our conversions to the floor, we should be fine.
DeleteWhen I gave the toy the first burst of paint, I purposely was aggressive toward the primed area to see how it would react and it is exactly as resilient as any model I have ever primed. As far as the sculpt, I was also pretty rough with it recently and the GS is anchored on very well, in fact, when I tested the durability a couple of my GW bits came off and had to be redressed.
DeleteThat being said I am 60% of the way through painting the model and have had no adverse effects or experiences.
I can tell you however, that very hard plastic toys, such as the plasma hatchers people use for mycetic spores will shed paintjobs in huge sheets from time to time, so not all toys are created equal.
Amazing work, TJ! That's some seamless sculpting.
ReplyDeleteYou, sir, never cease to amaze me. for quite some time I've had this aversion to using toy parts in with my tabletop gaming. However I do believe you've just cracked that aversion with this.
ReplyDeleteThat's how I roll, Tim. ;)
DeleteI think the common missing link when people use toys for this game is that they haven't "40k'd" them. This does not suffer from that affliction, as it is equal parts intentional and awesome. Can't wait to see the finished product!
ReplyDelete